|
Site News | |
Our Black Friday section is now online! Click here to check it
out.
|
|
| Active Discussions
|
|
[an error occurred while processing this directive]
|
|

| |
How to Update your Chevrolet Bolt
This has been tested on two 2018 Chevrolet Bolts (not Volts, don't have one to test with). Do this at your own risk, I'm not liable if you brick
your car, etc.
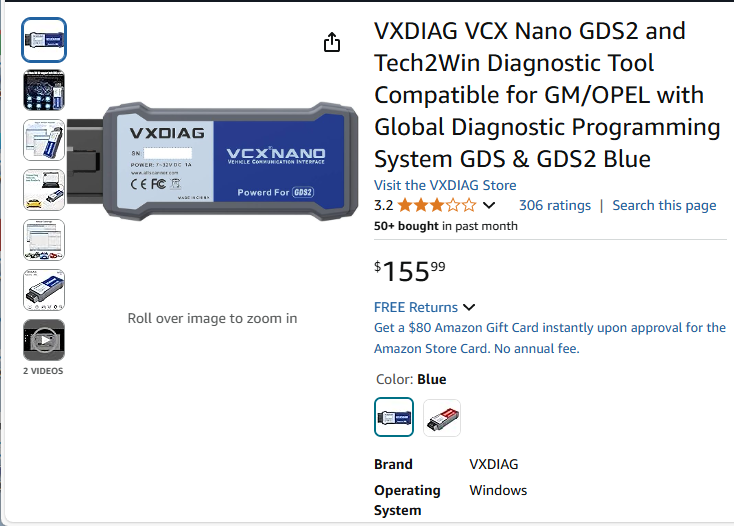
First, you need a programmer to connect your (Windows) laptop to your car. The one I used is this from Amazon: www.amazon.com/gp/product/B07YDCRTSD/.
I have successfully purchased one for less on eBay, YMMV. It looks like this:
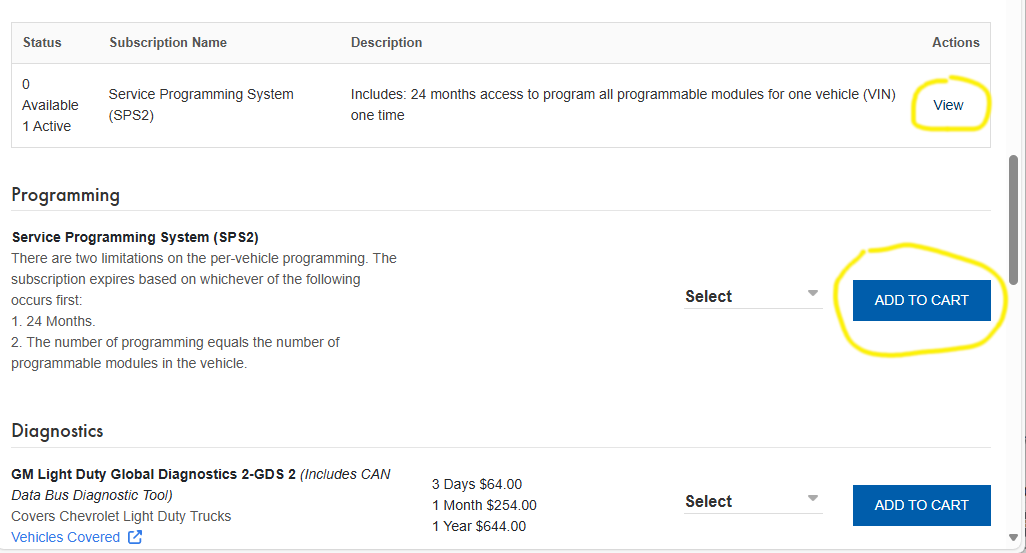
While you're waiting on that to be delivered, sign up for an account at www.acdelcotds.com. I'm not
sure if you can setup an account without purchasing a subscription first. I selected the 1 Vehicle for $45, it's the first option under
"Programming", then ADD TO CART, then checkout normally. Here's a screenshot of that screen after I've already purchased a subscription (I've
circled both the "View" for the currently purchased subscription(s) and the "ADD TO CART" where you buy a new subscription).
Once you get the programmer in, it may need help to be put in the right mode (if it acts as just a GDS2 device, it won't work). If you're feeling
lucky, the software needed should be included on a usb drive with the programmer; but note that it also has cracked software and may have trojans,
malware, and other bad stuff. That said, I unzipped the included rar file and in the GM\GDS2 directory there is a program called
"VX Manager 1.8.9.0601.exe" (or something similar if it's been updated) that will install the VX Manager for the programmer; the copy I have
does not appear to have any malware added. A (current) direct link from the manufacturer is
http://www.vxdiag.net/managecenter/download/vxdiag.zip and if you prefer,
here's a link from our site (clean scan at the time of uploading): www.thetechguide.com/downloads/vxdiag.zip.
Once installed, open VX Manager, you'll get this screen:
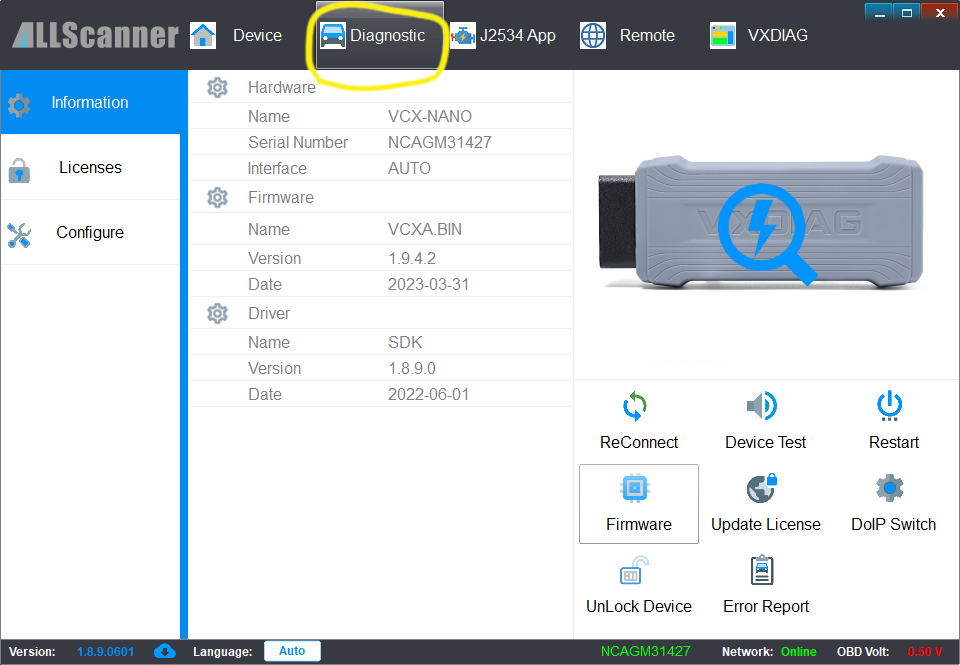
If it pops up wanting to do an update, that is ok. On the main screen, click the "Diagnostic" tab. You'll now see this screen:
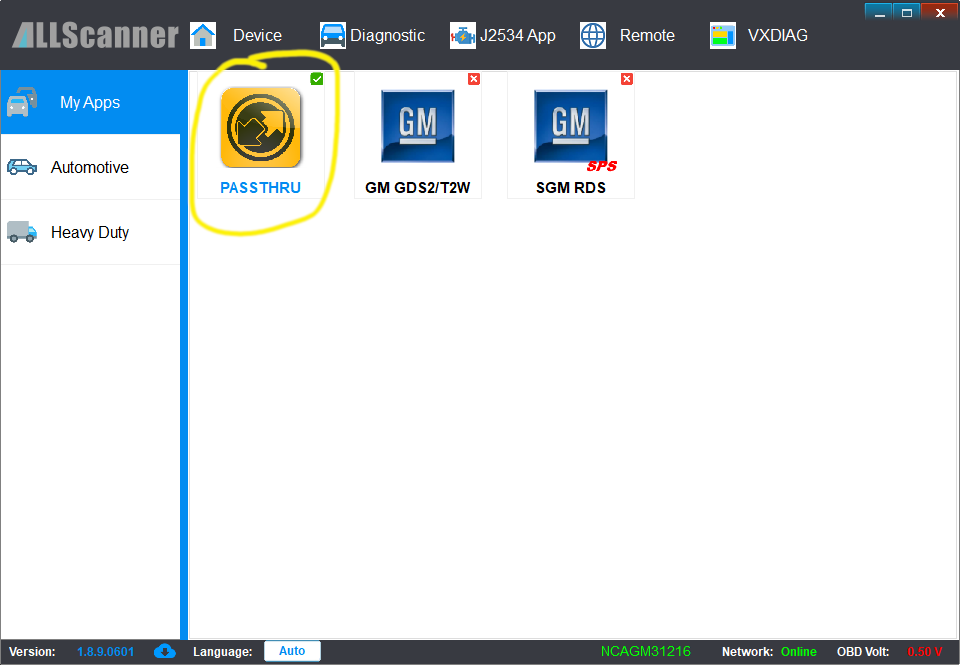
You want to click the PASSTHRU icon. Mine already has a green check next to it because it's already setup for that mode. You'll now see this
screen, click on "Install" (it's greyed out for me because I have already installed it).
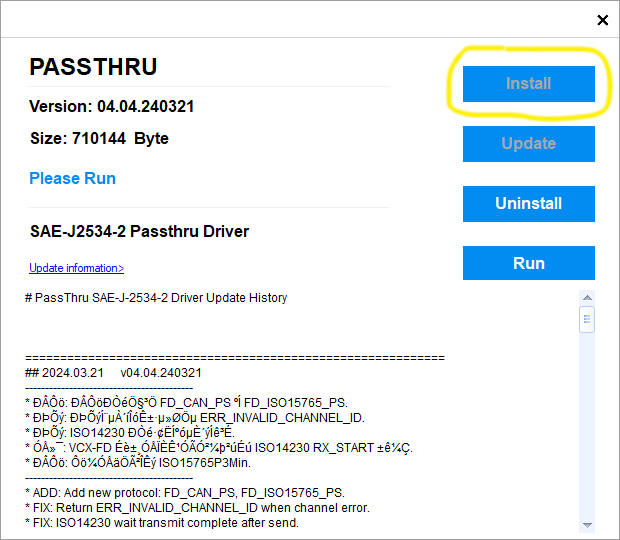
You may also need to install the SAE-J2534-2 Passthru Driver, simply click on "Run" on that same screen.
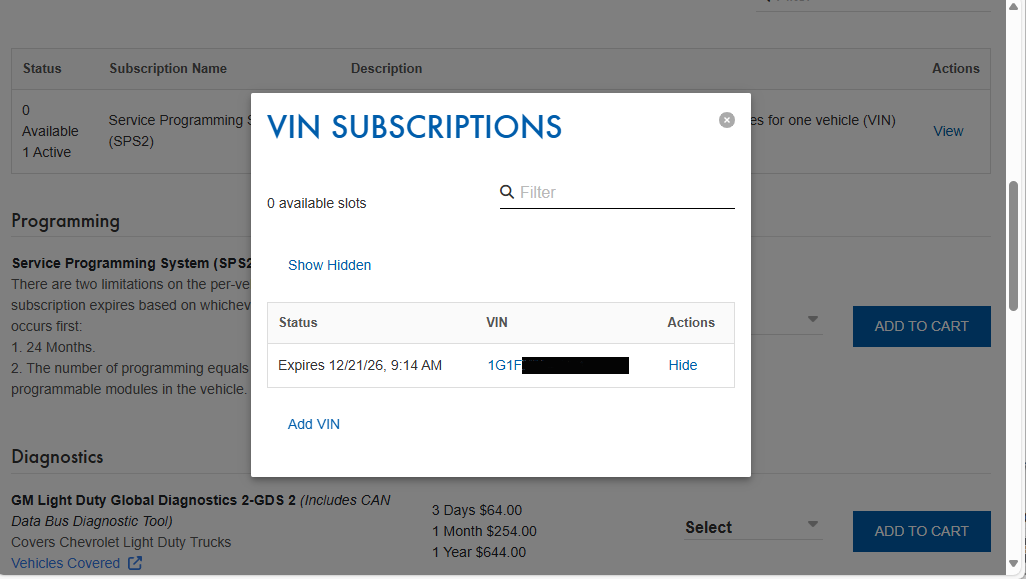
Once you've purchased a subscription, on the ACDelco page, click "View" next to your current subscriptions, this page will pop up showing all
your subscriptions (for this screenshot I only have one VIN). Click on the VIN number to go to the launch page.
On the launch page for Techline Connect, the first time it would do nothing if you try to launch as it's not installed. Click the DOWNLOAD tab
(at the top where it has LAUNCH, DOWNLOAD, and SPS INFO), download and install the program. Now click the LAUNCH tab (or just open again, it's
the default tab) and click the large LAUNCH TECHLINE CONNECT (I enabled the "Launch TLC with administrative privileges", it may not be necessary).
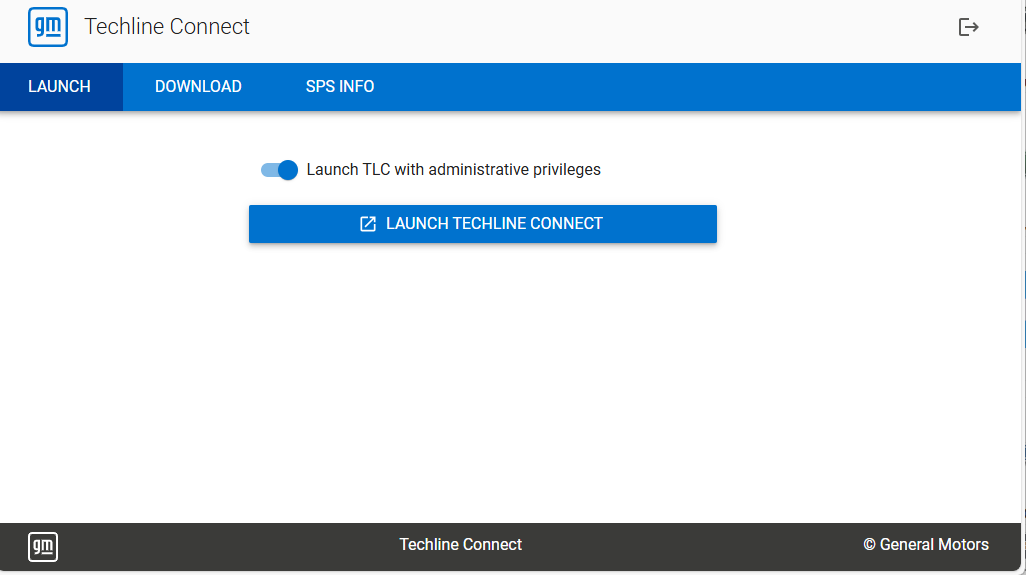
Note that you need a stable internet connection not just to download, but to launch the program. The first time it opens it will need to install
several modules, but even afterward it needs to do some checks, (it appears that the only time it doesn't require an internet connection is during
the actual flashing procedure). If you don't have a good internet connection where you car is, either move it to where you do or use hotspot on a
mobile device.
You should see this screen:
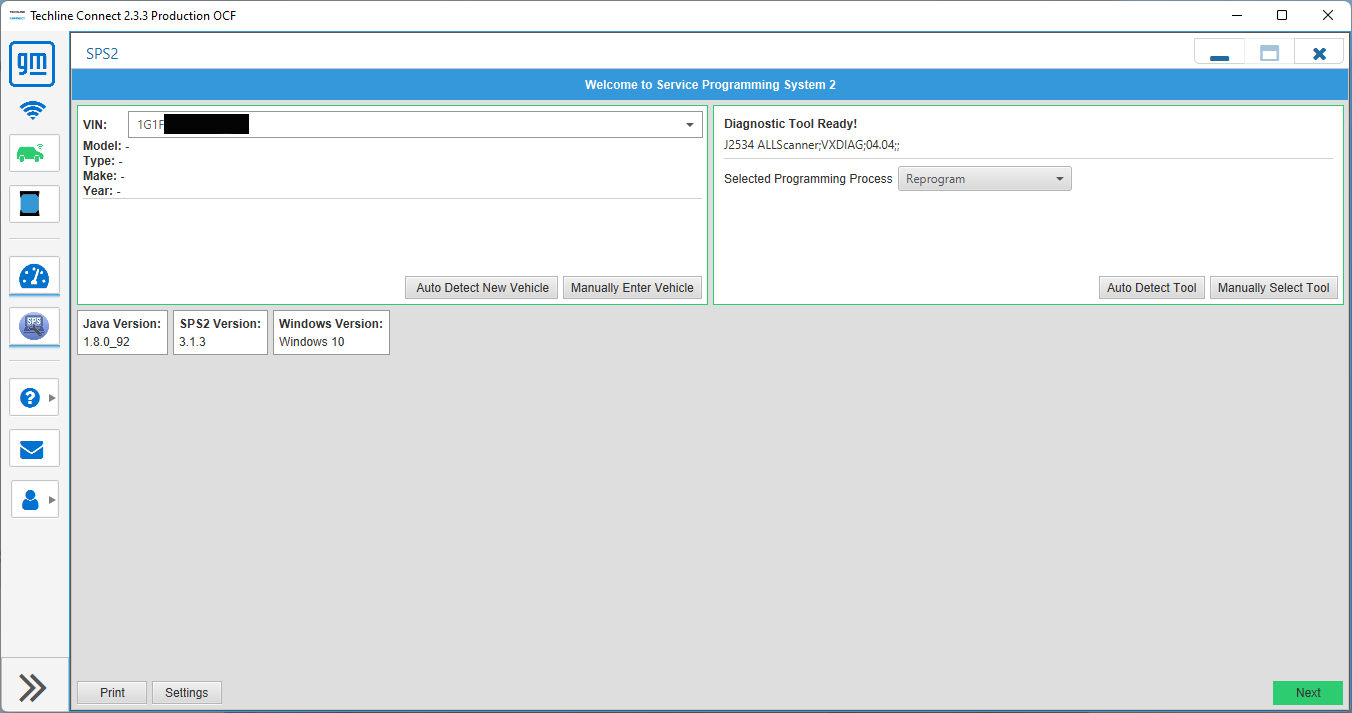
It should automatically detect the tool. Turn on the car without starting it (push and hold the Start button WITHOUT pressing the brake pedal,
after several seconds it will look like it started normally; this is akin to Accessory mode if you're familiar with "older" vehicles). Plug in the
programmer to the OBD-II port (driver's side, under steering wheel to the left). You should now be able to click on the "Auto Detect New Vehicle"
in Techline Connect and have it see the vehicle.
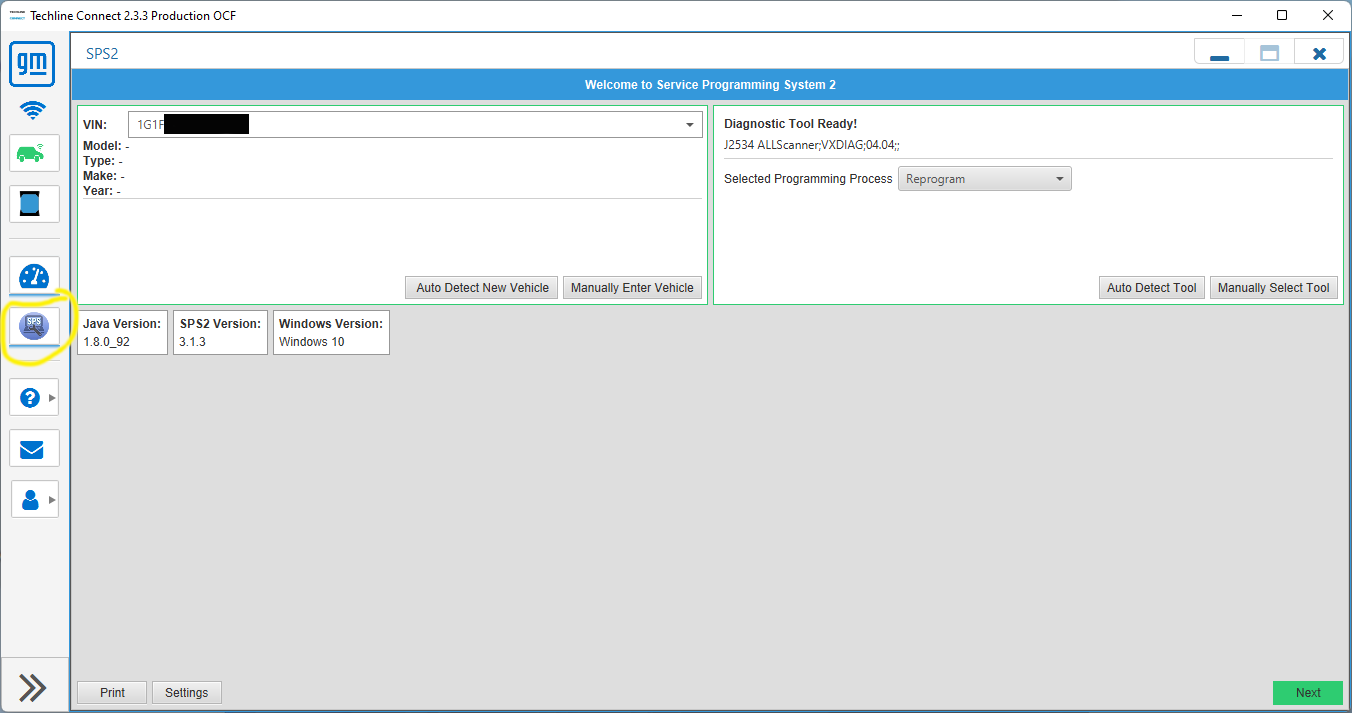
If Techline cannot see the car, make sure you see "Diagnostic Tool Ready!" on the right side of the screen. If not, try clicking "Auto Detect Tool".
If it shows "Diagnostic Tool Ready!" but underneath you don't see VXDIAG in the string (in the screenshot it shows "J2534 ALLScanner;VXDIAG;04 04;",
the "VXDIAG" part is important), try again to install the J2534 Passthru and the drivers, unplug and replug the programmer into the usb port,
and even reboot the laptop. Also, if you get this message:
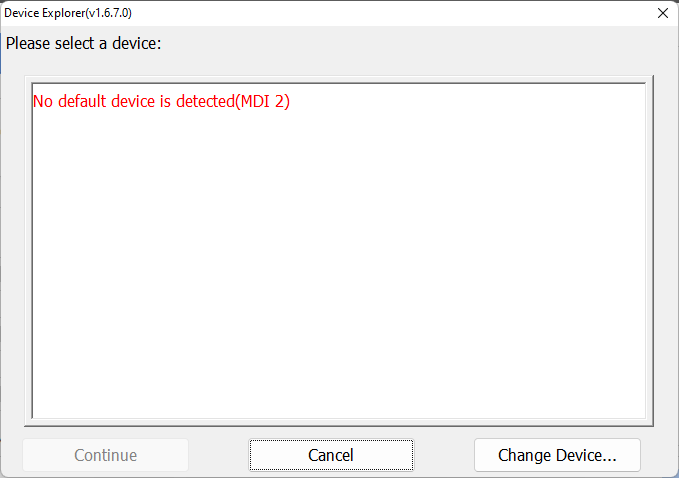
It's because the programmer is not being recognized correctly, try again to install the J2534 Passthru and drivers.
Once it sees your car, click on the SPS2 icon circled here:
For this example, we're going to flash the brake booster (to stop the annoying knocking sound that's reminiscent of a fuel pump knock). Click on
"K177 Brake Booster Control Module" on this screen to highlight it, then click Next at the bottom right (under your VIN):
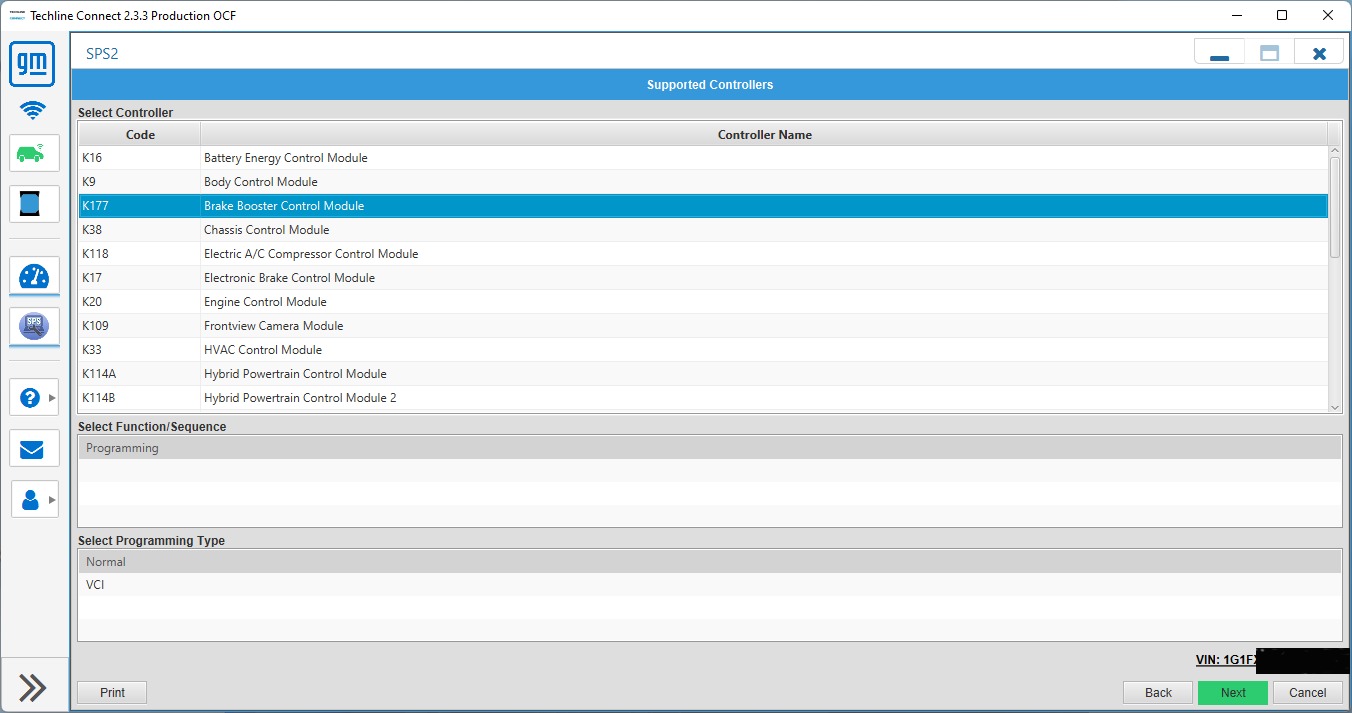
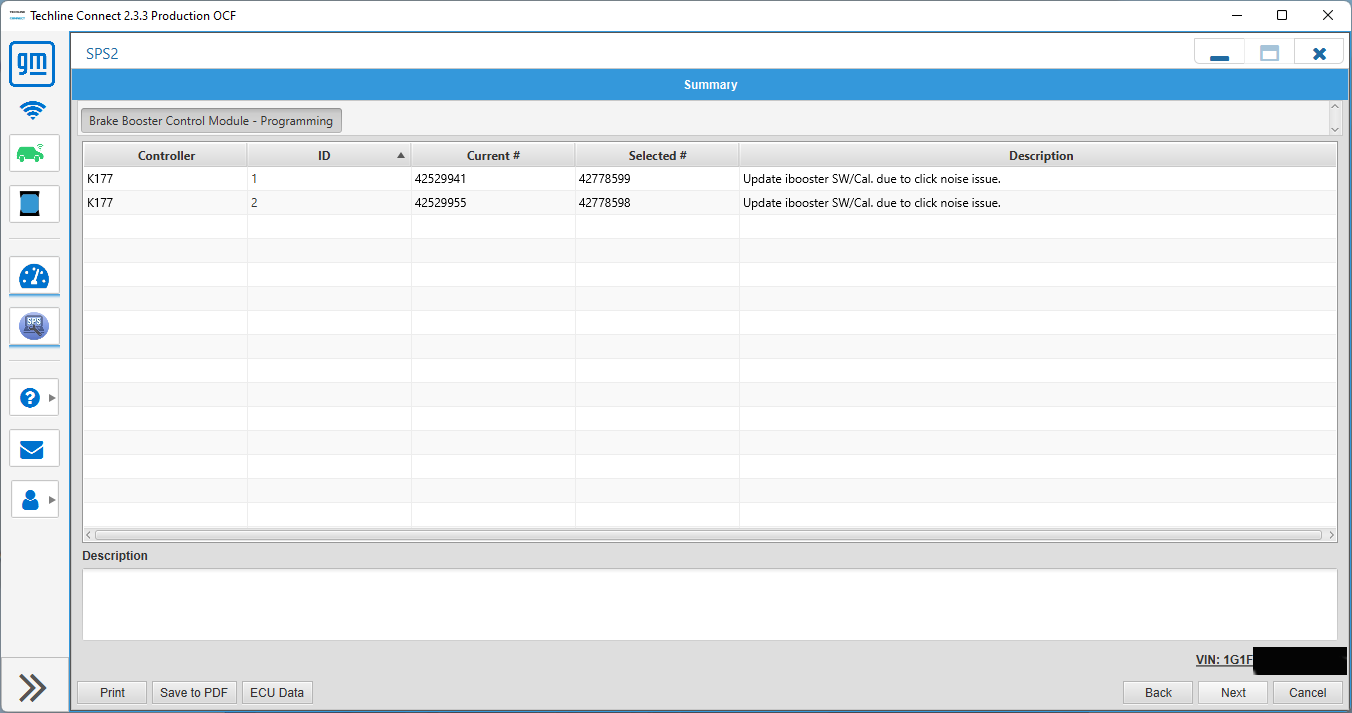
You should see a screen with more details about the Brake Booster Control Module, should look like this (press Next):
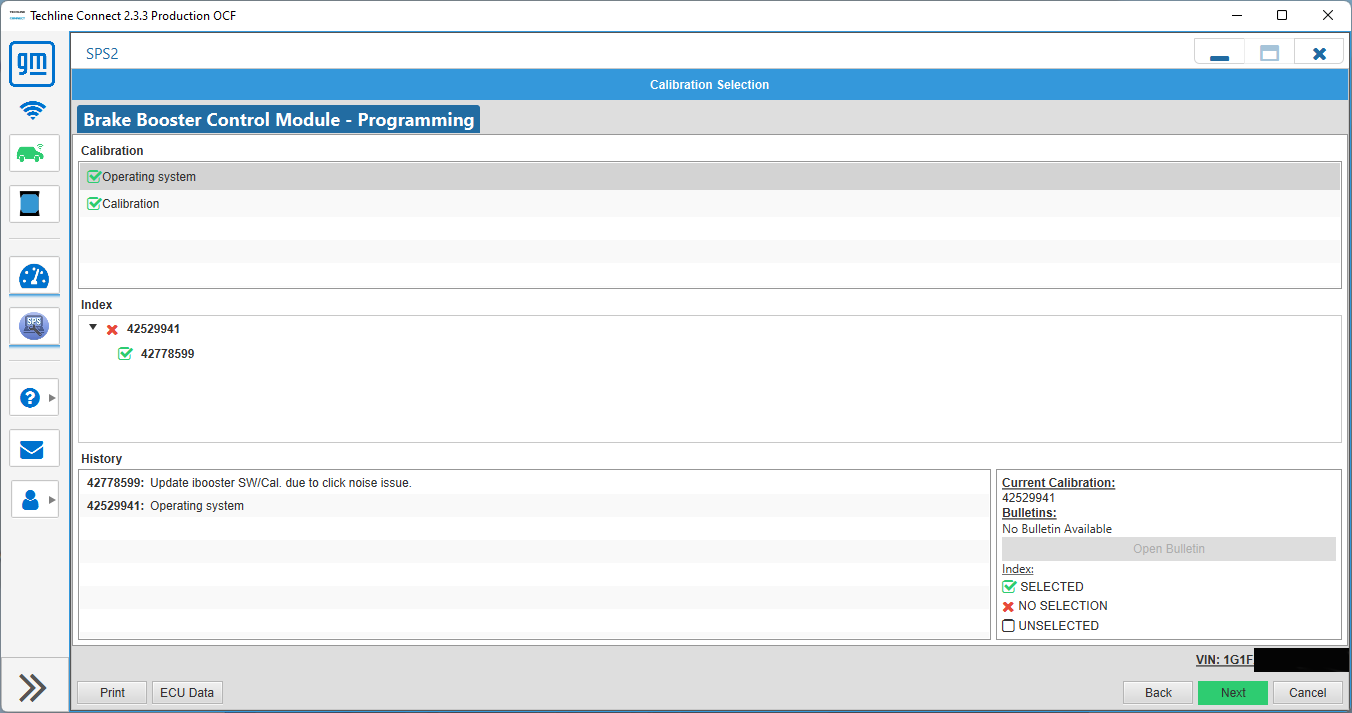
This screen shows more information about what you're flashing, the current and new versions, etc. If it looks right, click Next
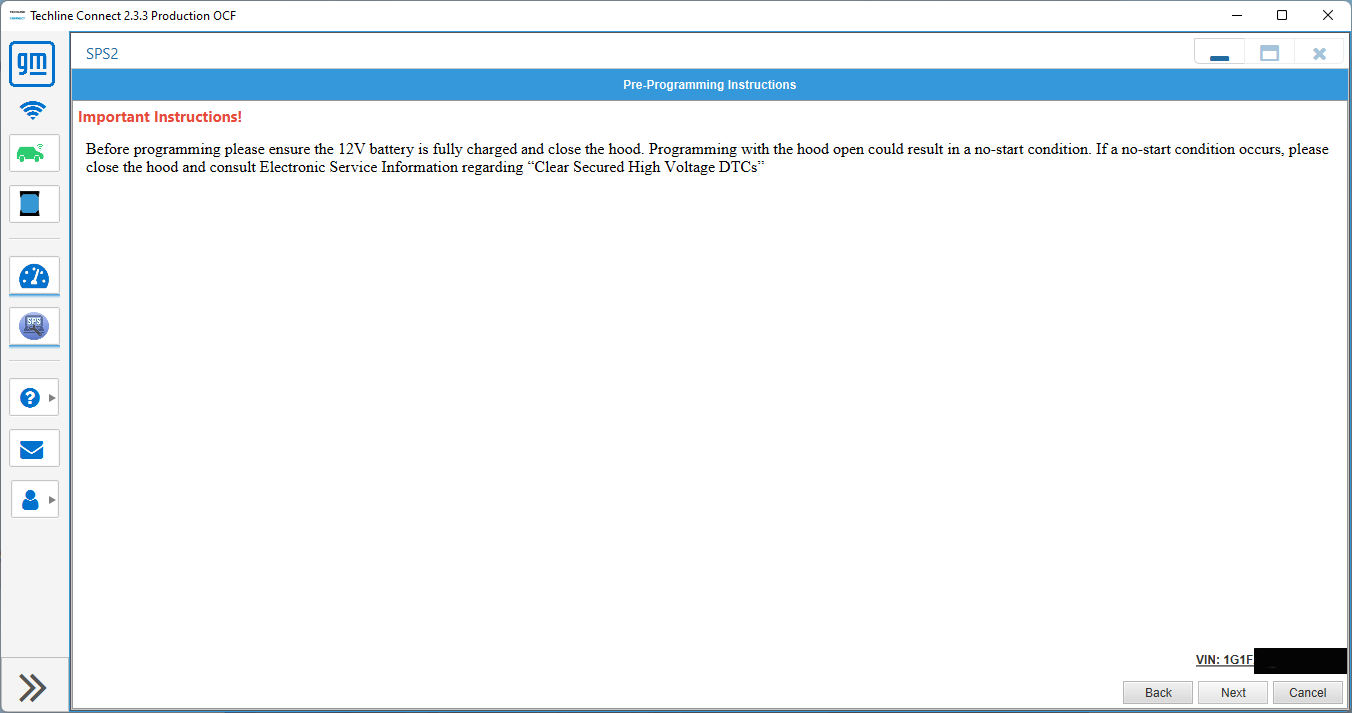
This next screen has important information; basically make sure your 12v battery is healthy and the hood should be completely closed. This is also
a good time to make sure your laptop is fully charged AND plugged into power
(while it should be fine on battery power, you do NOT want it shutting off in the middle of an update!). Press Next if/when you're ready to
start programming.
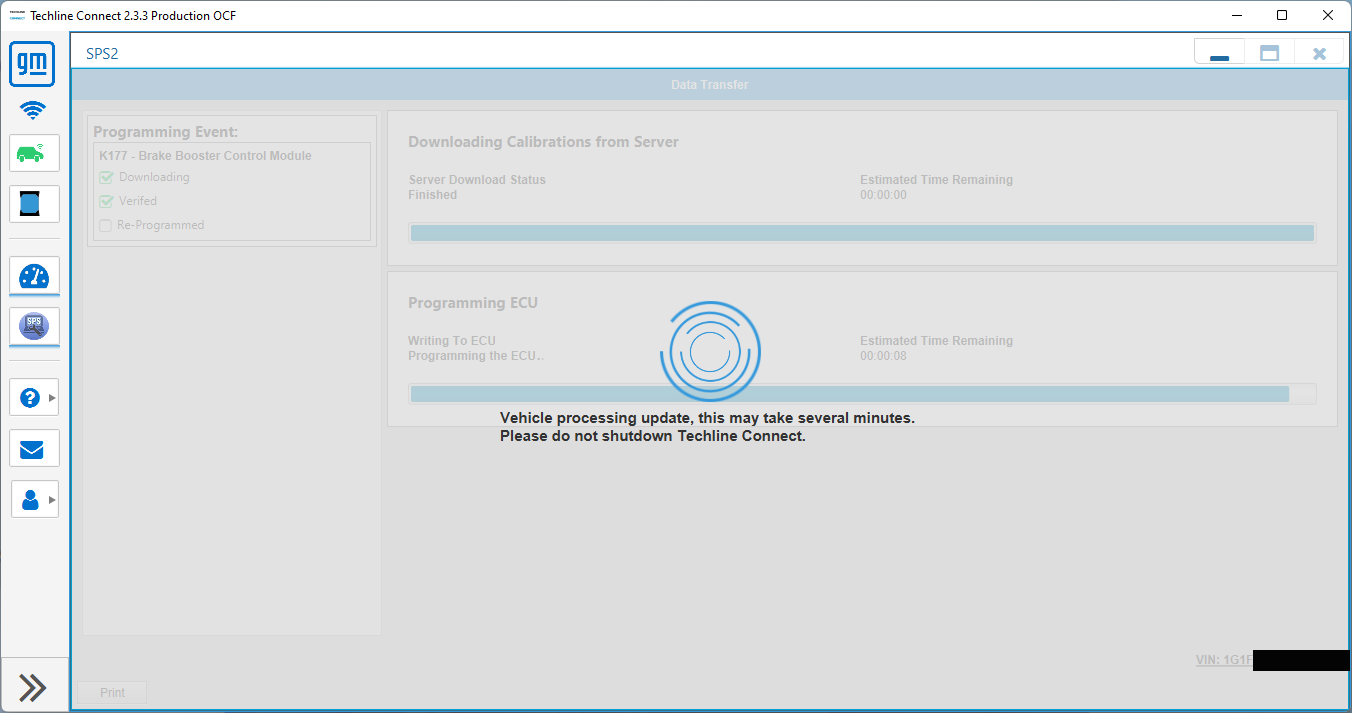
This next screen shows the downloading and then programming progress.

Once it's done flashing, the car has to apply the update, this may take a while, do NOT touch anything on the car (don't try to power cycle it,
don't disconnect the laptop, go eat a sandwich if you're impatient).
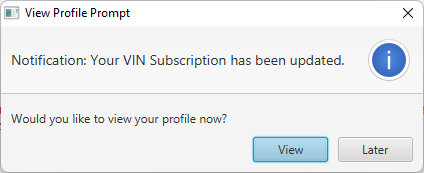
You may get a popup saying your VIN Subscription has been updated, you can view or dismiss, doesn't matter.
Lastly, the "Action Complete" screen. You don't need to do anything here. If you were a dealer doing warranty work, there's information you'd need
to get reimbursed, but you're done. Feel free to disconnect the programmer and shut down the car.
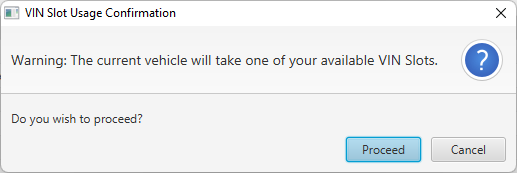
Here's two more popups you may see during the process. If you bought a subscription for one (or more) VINs, the first time you try to do anything
that needs the subscription, this will pop up. Basically giving you the choice to either use one of your free VIN slots, or cancel.
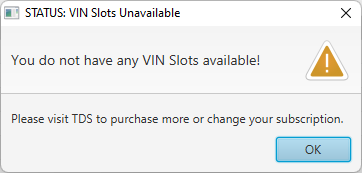
And you will see this if you had a valid subscription for a different VIN than the car you're currently connected to, and do NOT have an available
VIN slot to use (i.e. you need to go purchase one first, then try again):
Questions? Ask in the
forum or
email me.
For the Privacy Policy, click
here. | |
| |
|